When one starts to learn something new about embroidery patches, it may get a little intimidating in the beginning. For any starting digitizer creating new designs on embroidery patches and getting them digitized may seem a bit difficult, but as the move on the process gets smoother. So don’t feel tentative to take up this challenge and you will surely find your way around.
Embroidery patches is actually considered one of the most interesting digitizing process that most embroidery digitizers are fond of. Owing to their invigorating designs, patches will always remain on the topmost priority for both customers and digitizers. In this article let us take you through the exciting journey of embroidery digitizing of patches. Assuming you’re a starter, we will try to keep things as simple as possible without delving into much complicated areas.
Ordering and Deciding Raw Materials:
First things first, it is best to decide on the particular patches you intend to have your designs customized on. There is no limitation to the selection of shape or size, you can go along as you please. Whether it is round, square or rectangular you can select accordingly. Putting shapes aside, you can now decide on the size which may range from 1 inch onwards. A variety of different sizes are present in the market to choose from. Though you are free to select from a wide range of variety, you also need to keep in mind adjustments of your design and its crispiness after the patch is produced.

Next thing that should be considered is the color combination. You can decide to be bold and creative with your choice and come up with unique combinations or you can play it on the safe side and use common color combinations. Both have their own qualities. There are infinite possibilities of color combinations you can choose from. But we would suggest following a specific theme and have a whole thought process behind your choice. Select colors that will not only stand out but also goes along with your company or brand image.
Now coming to the back of the patch. You can either choose to make it plain or heat sensitive. The advantage of having a heat sensitive back is it can easily adhere to whatever you want to stick it onto. But it relatively is very hard to embroider. So, if you are new to this patch embroidery digitizing, we would suggest you stay away from this for a while and opt for the plain ones. This will in turn avoid you from getting yourself into un-necessary troubles while embroidering.
Satin Vs Merrow Border
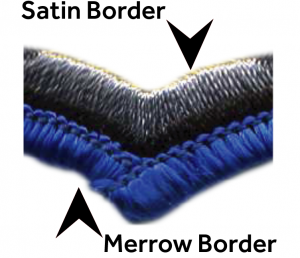
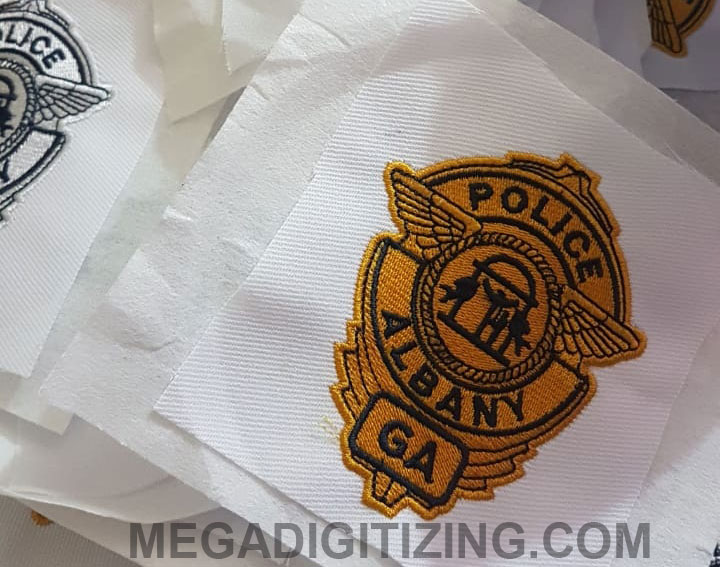
One thing that most embroiderers do not pay attention to is the border of the monogram patch. This border is called Merrow. You need to choose its color carefully. This is done to give neatness and provide perfection to the patch. It’s basically a thread which is used to overlock the patch at the ends.
Best Softwares used for Patches embroidery digitizing:
- Brother PE-Design Plus.
- EmbrillianceStitchArtist (Best for MAC)
- Amazing Designs – Digitize N Stitch.
- Embrilliance Essentials
- Embird (For Beginners)
Read More: Best Free Embroidery Digitizing Softwares
Digitizing for Embroidery Patches:
What you need to do is simply scan your patch and bring it into the desired image format recognized by a computer. After that, select a suitable digitizing software to work on that image. This software is going to act as the base on which your design will be edited. Bring the whole design to a position with everything in line perfectly centered.
Be careful not to exceed your design over the borders created in the software. The reason for this is when you will get the machine to digitize your patch, it might disturb its alignment or crop off an important part. This will create problems in manufacturing the patch designs. So, in short keep these few things in mind while doing your editing.
Make sure to make a running stitch first beforehand. This will allow you to check the alignment of the machine to ensure where the patch will be produced. To make it simpler you can continue digitizing your design over the running stitch you just created.
Now finally, make an outline stitch around your design and add a stop function to it. This will allow you to create your design within a borderline and give neatness to it. You can use this outline as a reference to align your design which simplifies the whole process. The only thing you will have to worry about is having your patch adhere to a fabric. But you will be glad to know, there are numerous ways to get this done also. Choose whatever option that suits your needs.
Sticking the Embroidery Patches:
Stabilizer
If you know even a little bit about producing patch embroidery, you will agree stabilizer is a very basic way to stick your design onto fabric. You can also use a sticky back.
But be aware, your stabilizer can get stuck to the needle also during the process. This becomes a huge hassle and often results in breaking the needle specially if you are dealing with more than one patch design. What you can do however, is put machine oil in the needle and make it smoother.
Spay adhesive
Use a spray adhesive that is used for machine embroidery. It is as simple as can be. You can just spray on the back of the patch and also see if it firmly sticks to a fabric or not. If it doesn’t, try putting another coat of Spray adhesive until you finally reach your desired results.
Make sure not to get the spray particles over any area of the machine. It can create major problems for the working of machine.
The cost of digitizing is dependent upon the count of stitches required as well as any changes needed in the logo embroidery. You can even get a quote from us. We at Mega digitizing are a professional team of in-house digitizers capable of fulfilling all your requirements of patch embroidery digitizing. For superb quality results with best turn around time, contact us right away! We may be able to come up with a good deal for you today.
MegaDigitizing Custom Embroidery Patches Offer
Quantity: 50 in $90.
Quantity: 100 in $120.
Above Price is for Patches under or equal to 10,000 stitches.
– Free ( Setup, Digitizing, Free Sample and Free Shipping all around the world)
– No Extra charge on backing
– Unlimited Revision in Samples.
– No Extra charge for additional color.
– Normal Delivery : 6-8 days (Working days after approval)
– Rush Service Available: 3-5 days (Working days after approval)
– Money Back Guarantee if not satisfied.
– Any Shape, Any Size
– Prices are based on stitching
– Minimum quantity is 10
SEND YOUR ARTWORK TO GET A PRICE QUOTE
CLICK HERE TO REGISTER WITH US